

How To Set Up A Fish Tank Sump
At some indicate during your research into aquariums, this thing called a 'Sump' may have kept popping up and I think thinking 'What the heck is that' when I get-go heard almost them. My idea of a sump was something that sits under my house to stop the basement flooding! How did that have any connexion to an aquarium?
An aquarium sump is an boosted tank or vessel that is usually installed in the aquarium stand up. Water moves from the aquarium to the sump and back. Sumps provide additional infinite for installing filtration equipment out of sight and increase water volume to assist maintain water stability.
When selecting your side by side aquarium a sump can be a very beneficial addition to both a freshwater and saltwater tank so let's go and look at the sump and hash out why you should actually look at getting a tank with one!
Contents – Click To Spring To That Department
- What is an Aquarium Sump?
- How Do Sumps Work?
- Aquarium Sump Sections
- Types of Aquarium Sump Design
- Where to Install an Aquarium Sump?
- Flow Rate Through Sump
- Sump Installation Precautions
- Aquarium Sump Vs Canister Filter
What Is An Aquarium Sump?
In its most basic course, a sump is an additional tank, vessel, or container that sits outside of the aquarium. The sump can be a simple single chamber container or a purpose-built tank with multiple chambers that each have a specific purpose.
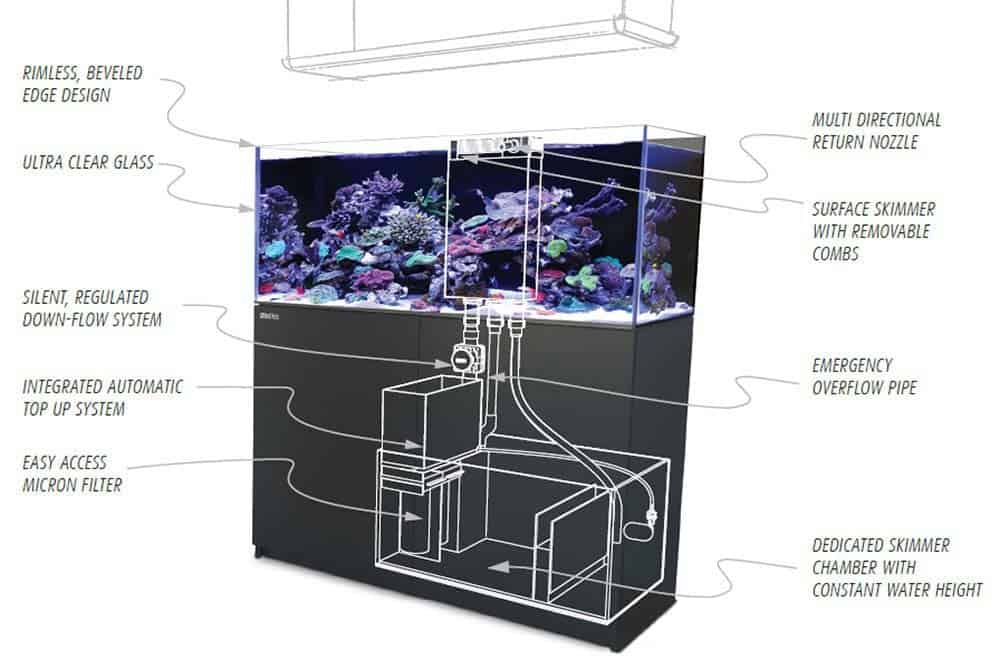
The main benefits to adding a sump to your aquarium are:
Increased water volume
Adding a 20g gallon sump to a 50gal aquarium has just increased the total water book by 40%! This tin really help continue h2o parameters more stable.
Hides Equipment
There is nothing worse than seeing a beautiful aquarium but then be distracted by cables, pipes, and gadgets hanging off every wall in the tank.
Larger Equipment
Filtration equipment comes in many sizes and when y'all are express to what size filter you tin can physically fit in/on the aquarium, information technology can shrink the production pick yous have to choose from. Having a sump allows you a greater choice of filtration equipment.
More Filtration
Having a sump allows y'all more than infinite to add together additional filter media to aid control parameters like nitrates and phosphates. Chemical media can be placed into mesh bags or media reactors that tin can hang on the side of the sump.
Calculation material to increment leaner surface areas similar MarinePure (Amazon.com) blocks can dramatically increase the biological load (bioload) the aquarium tin can at present support = More than livestock.
Algae Buster
A sump allows you to install devices like Refugiums or Algae Turf Scrubbers to grow the algae out of sight rather than it growing all over your main aquarium.
To help you understand more about what a sump is you tin can find a keen choice of varying sized sumps to reference while you read through this commodity Here at Aquarium Specialty.com
So as you lot tin see a sump may non sound like much at first glance but the benefits far outweigh the cons and if y'all accept not bought an aquarium yet or are thinking of an upgrade and then an aquarium with a sump will exist one of the best decisions you volition brand in this hobby!
How Do Aquarium Sumps Piece of work?
Sumps work by having h2o bleed down from the chief aquarium via a weir and overflow section and into the sump. The water then passes through the filtration in the sump before being pumped dorsum up to the main aquarium.
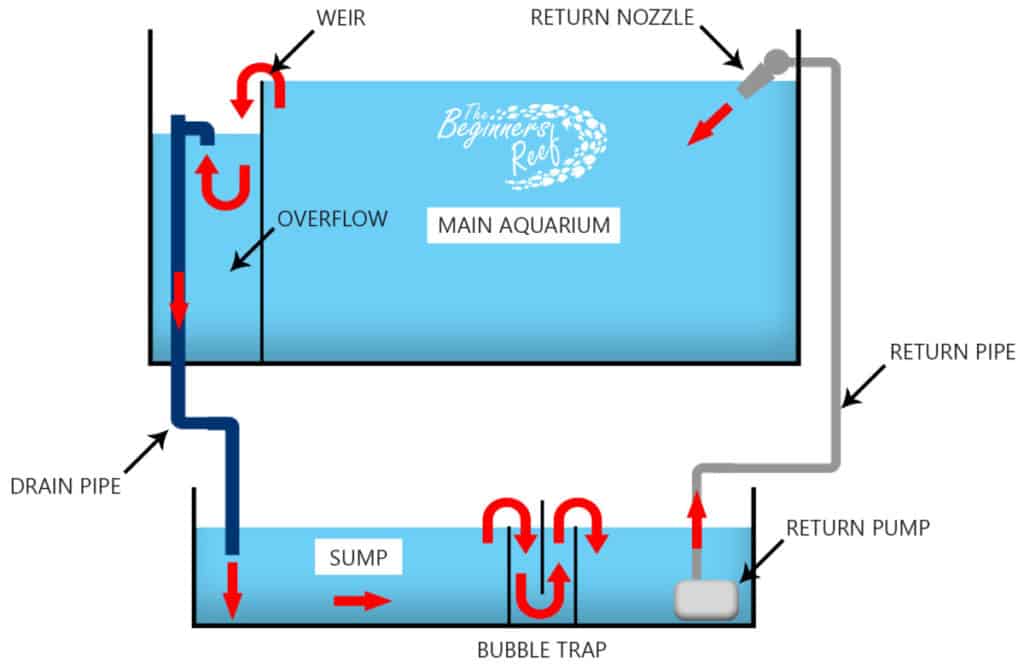
The circulation of water never stops providing the 'Return Pump' is operating. As the h2o gets pumped dorsum into the master aquarium, it passes through a weir and drops into the overflow section. This is what keeps the water level in the main aquarium constant. It and so drains into the sump and is so pumped back to the main aquarium.
Recollect of this just like the overflow pigsty yous see in every bathroom sink. When the h2o gets too high in the sink, information technology goes through the pigsty and downwards the bleed pipe.
This is exactly how the aquarium/sump system works. Simply instead of the h2o flowing out to the sewage treatment institute, it flows into a vessel under the sink, gets filtered, and pumped dorsum out of the faucet.
If you would like to find out more about how to size and select the correct Return Pump for your sump please be sure to check out my article: Aquarium Return Pumps – Footstep By Step Selection Guide
What Are The Different Parts Of An Aquarium Sump?
Sumps can be every bit basic as a blank glass tank or can be custom machined from acrylic to do any the owner wishes simply virtually sumps take some common sections within them to help improve the efficiency of how the sump works.
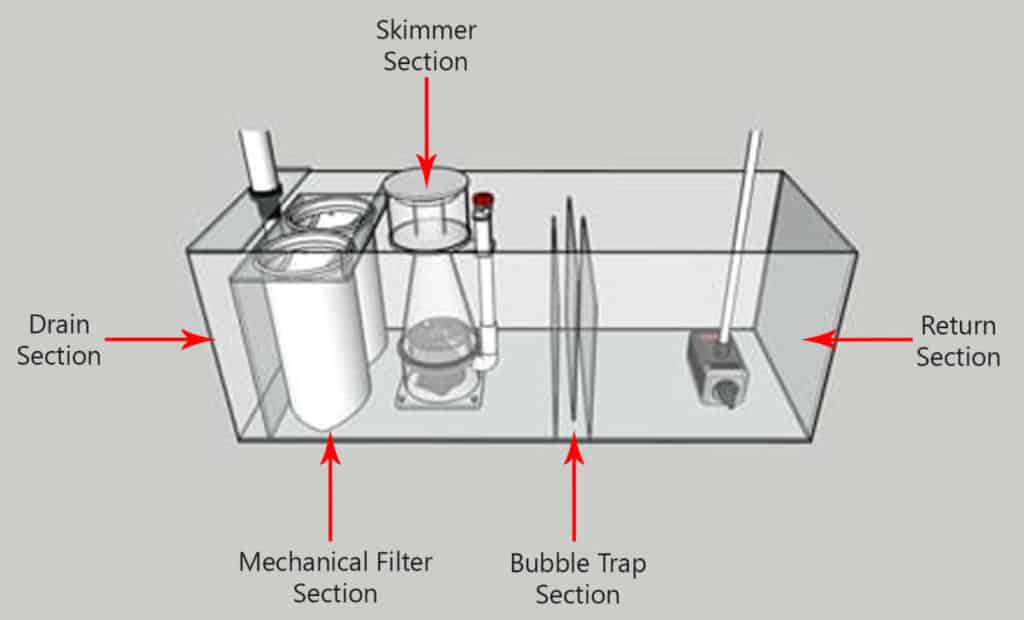
Bleed Department
This starting time section is where the water enters the sump from the primary aquarium. At that place can be merely a unmarried drain piping or multiple drain pipes collect in this area if the aquarium has 2 or 3 overflow sections.
It can either be its own covered section to preclude h2o splashing everywhere and creating table salt buildup, or information technology is usually combined with the side by side section – The Mechanical Filter Section.
Mechanical Filter Section
The first office of the filtration that the h2o meets in the sump is the mechanical filters. These tin can be socks fabricated of filter fabric, sponge pads, mats made of filter floss, or a relatively new device that is taking the market place by storm – The Fleece Roller or Roller Mats equally they are known.
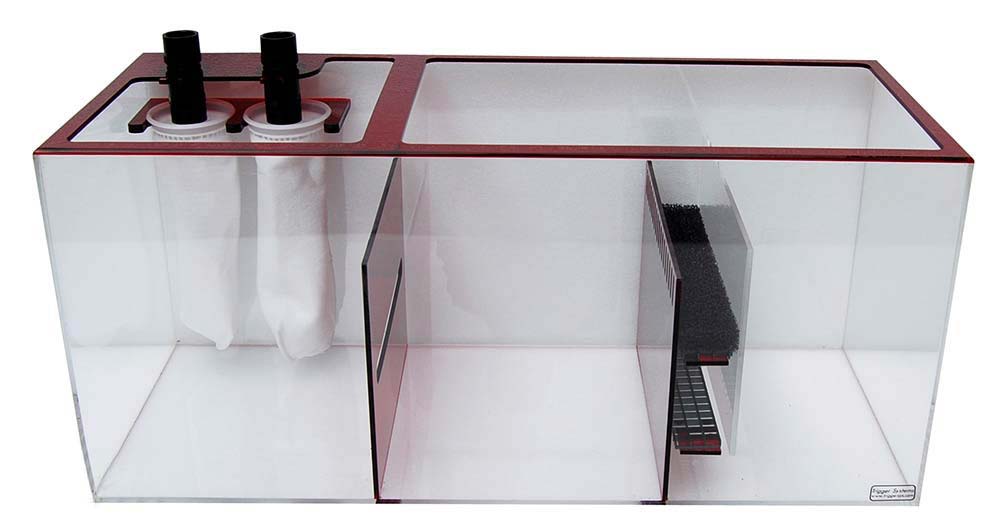
The main job of the mechanical filter is to catch the large particulate matter suspended in the water and then it tin exist removed before it gets take chances to break down and decay.
Skimmer Department
This department is more applicable to saltwater aquariums and is where the Protein Skimmer is placed. Once the large particles take been removed by the mechanical filter, the protein skimmer gets to remove the Dissolved Organic Compounds from the water.
Poly peptide skimmers accept a recommended h2o height that they must sit in and some sumps come up with an adjustable wall on the Bubble Trap to allow the owner to set the h2o level elevation in the skimmer section.
For those sumps that are unable to fix the h2o level top, virtually aquarists make feet or a shelf to sit the protein skimmer on then information technology sits at the optimum recommended height.
Bubble Trap
Bubbles are a big nemesis in saltwater aquariums. They are very pop in freshwater aquariums but we need to prevent them as much as possible in saltwater. As the water drains into the sump and goes through the poly peptide skimmer it becomes full of tiny microscopic bubbling.
Microbubbles can distress fish and coral and considering of the stiff lighting in a saltwater aquarium, they really show upward in the water column. Aquarists desire their h2o to be every bit pristine & clear equally possible and a chimera trap is a great mode to help accomplish this.
A chimera trap is a series of 3 baffles that trap bubbles and release them from the water. As the water cascades over the first baffle, its bubbles are released and travel upwards. The water and then flows down and under the second baffle with virtually no bubbling in it. Whatsoever bubbles left are released as the water travels up and over the third bamboozle.
This simple device prevents any bubbles being sucked into the render pump and blown into the main aquarium.
Return Department
This section is where the Return Pump is located. The job of the return pump is to transport the water support to the main aquarium so more water can pass into the overflow and return to the sump to pass through the filters.
Pumps can either be a submersible type and sit down within the water of this section or be an external pump and draw the water from this section.
The important part every aquarist needs to know is that this is the section where the water level volition decrease equally the aquarium water evaporates. If left unnoticed the h2o would drop until the pump runs dry which will cause the pump to fail.
The other major trouble with water evaporating is that it leaves the salt backside, so as more h2o evaporates the remaining water volition go saltier as the ratio of water to salt reduces.
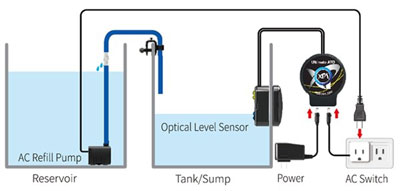
To overcome these ii issues one of the first upgrades an aquarist will purchase is an Automated Summit Off Organisation. Yous can find out all y'all need to know nearly ATO systems in my article: What Is An Aquarium Auto Acme Off?
Additional Sump Sections
If you have space where the sump is going to sit down or you wish to build your own custom DIY sump then there are two additional sections you lot can install to make the ultimate sump:
1. Refugium Section
A refugium is an area dedicated to growing macroalgae and allowing Copepods to grow without being eaten. By growing macroalgae in this area, y'all tin can dramatically reduce the amount of phosphate and nitrates in your aquarium allowing for cleaner and healthier water.
For a far more than in-depth look at Refugiums delight take a look at my commodity on them: What Is A Refugium?
ii. ATO Reservoir
In the return section of the sump, I mentioned how this is where evaporation occurs, and to keep stable water parameters nosotros tin install an Automatic Meridian Off organisation to furnish the evaporation with freshwater.
This freshwater needs to come from somewhere and normally most people fill a 5-gallon pail with freshwater every week to continue the system working. Having a reservoir built into the sump keeps everything neat and tidy.
Are There Different Types of Aquarium Sump Design?
There are so many designs of sump available that you volition have no problem finding i that fits your available area or tin have all the sections yous need. If y'all are unable to find one so you tin build your own like I did or accept one custom made.
These next designs will give you lot the basic layouts of the virtually mutual sumps available.
The Most Bones Sump Design
The mechanical filter, skimmer section & return sections are all together – No baffles or bubble trap.
This is the simplest option simply provides no style of removing any bubbles or keeping the h2o level a constant height due to evaporation of the whole department.
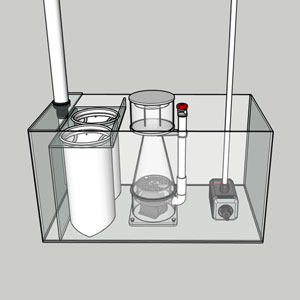
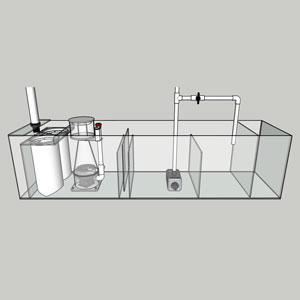
The Near Pop Sump Design
Mechanical filter department and skimmer section in 1 area and a bubble trap with a render section.
This allows the skimmer section can accept a constant water height and the return department tin be bubble gratuitous.
3 simple glass or acrylic pieces are all that is required to improve on the Bones Sump Pattern
The Most Efficient Sump Design
Installing a sump with a built-in Refugium is a neat choice for those who can fit it. By Tee-ing off the render pipe the owner can install a valve to gear up the period rate through the Refugium to allow the mass of Macroalgae to turn.
The Refugium water and then cascades over a dividing baffle and dorsum into the return department.
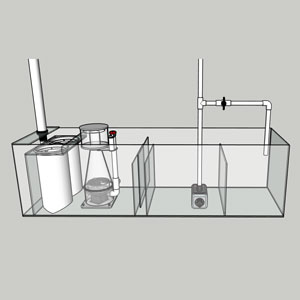
The Ultimate Sump Pattern
This design of sump adds an surface area for a ATO reservoir. Having v-10 gallons of freshwater available for the system means this area only has to be refilled once a calendar week (depending on the tanks evaporation rate).
A solenoid valve on a timer or toilet-style float valve can allow for this department to automatically remain filled likewise!
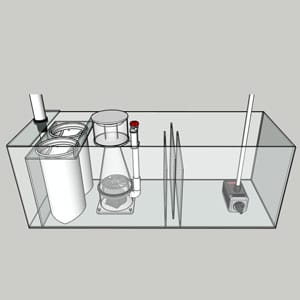
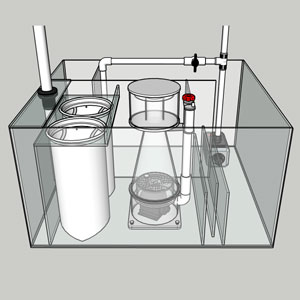
The Compact Sump Design
For those owners that have a Cube-Shaped aquarium or are tight on space, having a compact sump allows for all the efficiency of the larger sumps just in a more compact space.
These require a little more than careful equipment option to exist able to fit in the sections and maintenance can be a little tighter to piece of work on, but overall a not bad type of sump!
Where Do Yous Install an Aquarium Sump?
This section is cleaved down into 2 parts:
- The overflow part of the aquarium/sump installation
- The physical location of the sump itself
The Aquarium Overflow
If you lot take a sump, yous demand a way to get the water from the display tank down to the sump. This is where a weir and an overflow come in.
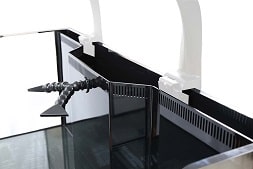
The weir acts as a barrier to setting how high the h2o level is in the chief aquarium. It unremarkably contains teeth or grooves cut into an acrylic sheet to prevent snails, crabs, and fish getting into the overflow department.
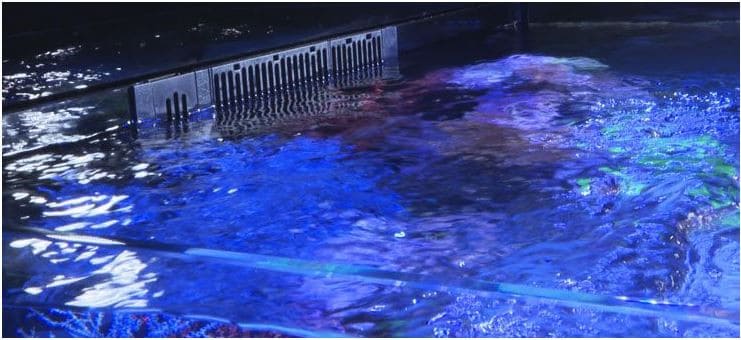
The weir too acts equally a surface skimmer to pull any junk or debris floating on the water surface into the overflow to be taken to the filtration.
The overflow section is where the water collects after cascading over the weir earlier entering the drainpipe to run into the sump.
I accept seen and worked on many of the popular types and I'1000 going to guide you through each type:
Reef Ready – Drilled by Manufacturer
You can buy tanks pre-drilled from the manufacturer with a Drain Pipe, Return Pipe, and Overflow pre-installed. These are very skillful tanks and are very popular. Reasonably priced too.
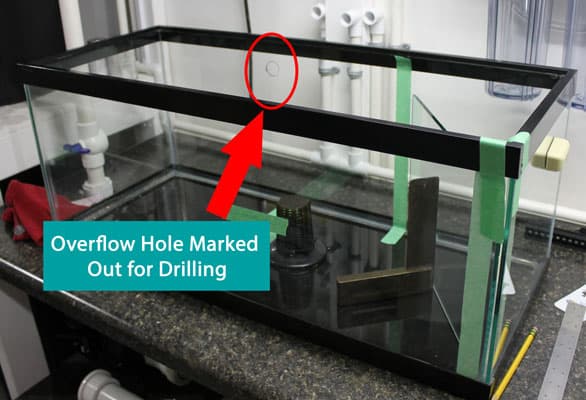
Internal Overflow – Drilled past Owner/Store
This blazon of overflow is very popular with the DIY'er as it allows you to custom craft your tank to suit your dwelling and gear up upward. An internal overflow uses a box on the inside of the aquarium with a hole or holes drilled through the side pane to either a plumbing bulkhead (Durso Method) or some other box with which several drain pipes tin be fitted (Herbie & Bean-Animate being Methods).
'Ghost' Internal Overflow
The Ghost Overflows are a great choice as they are very depression profile with the minimum corporeality of box on the inside of the aquarium. They practise disappear well into the back/side walls and will be my option on my next aquarium. They come up in various sizes and permit for multiple drain pipes making them silent in operation (Bean-Animate being Method).

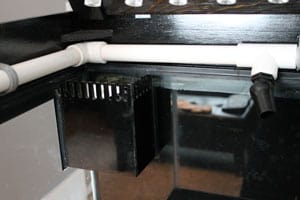
External Overflow – Custom Tanks
This type of overflow is likewise very popular especially if you are having your tank custom built. This overflow has the side/back pane notched out at the top to provide the leave for the water to fall into a collection box on the back of the aquarium.
A black acrylic console is and then placed over the pane with teeth machined into it to keep critters out of the overflow. The only part of this overflow you can encounter from the forepart is the teeth on the weir.
These are the best overflow in my stance but price the virtually considering the glass panel has to be machined and a drinking glass box constructed on the outside of the aquarium. You are able to fit whatsoever of the 3 drain styles into information technology (Durso, Herbie & Bean-Fauna) making it super silent.
If y'all are having your aquarium custom built this is the overflow to pick!
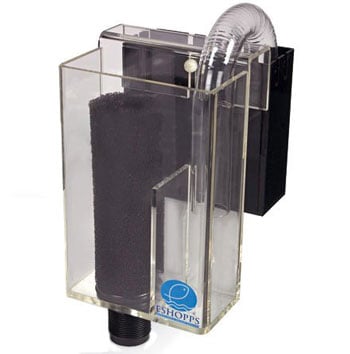
Siphon Overflow!
I take left this overflow until last because, in my opinion, they can create so many headaches. They are for tanks that are not drilled. They provide a ways of moving water out of the display tank and down to the sump by using a siphon.
They siphon h2o over the rim of the aquarium, collect it in a box and send information technology down the connected bleed pipage.
I cannot propose yous enough to stay abroad from these overflows . Just take your tank drilled or purchase one drilled. They are easy to drill!
This type of overflow has acquired me more than problems on clients' tanks considering when y'all get a power outage, the siphon breaks, and sometimes the siphon starts on power-upward, and sometimes it does not.
You can buy a small pump that sits on top to suck water into the siphon, simply information technology's only a bandaid.
Many a tank has been flooded considering the power comes back on, the return pump starts, but the siphon does not. The render pump and then empties the contents of the sump into the display tank and information technology overflows!
Save yourself the headache and get a drilled tank if you want a sump or an All-in-One Aquarium.
The Sump Location
There are 3 master locations that virtually aquarists install their sumps in their homes.
- Inside the Aquarium Stand
- Below the Aquarium in the Basement
- Behind the Aquarium in a Separate Room
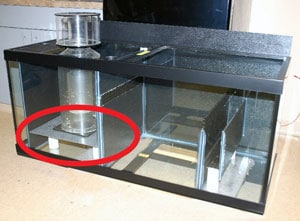
1. Sump Within the Aquarium Stand
This is by far the almost popular location for many aquarists due to the ease of plumbing and it is easily subconscious abroad one time the stand doors are airtight.
There are some very, very nice sump installations in this world, and I'm surprised at only how much equipment tin get crammed into a stand.
This is a typical way to install a sump in your organisation.
The convenience of this location is groovy but it comes with a few drawbacks:
- Limited space to mount boosted equipment
- Electrical and Saltwater are within very close proximity to i another
- Difficult to move equipment in and out for cleaning and maintenance
- Yous are on your knees leaning into the stand – Trust me it hurts after a while!
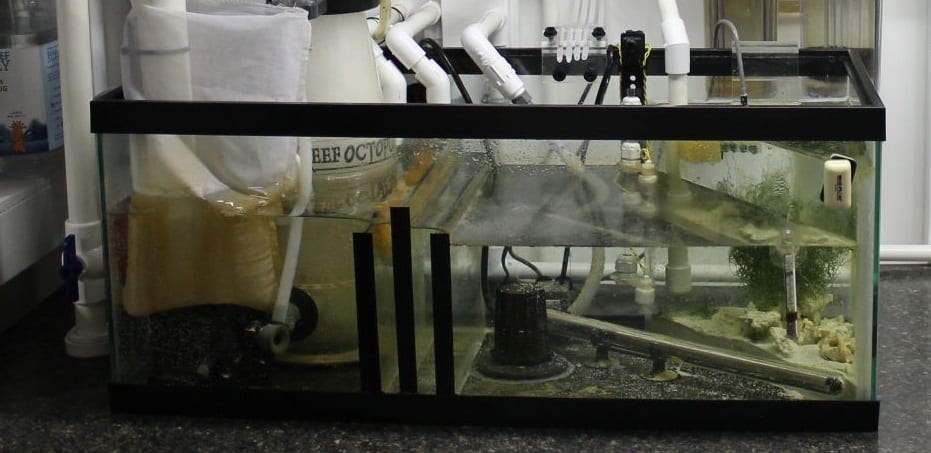
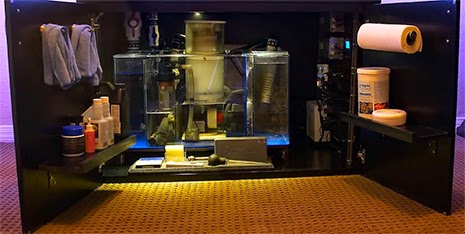
2. Sump Below the Aquarium in the Basement
This is a great option if your dwelling and budget allow for it. It doesn't cost that much more, but the benefits of having infinite and everything mounted at a prissy working pinnacle makes a huge departure in doing maintenance.
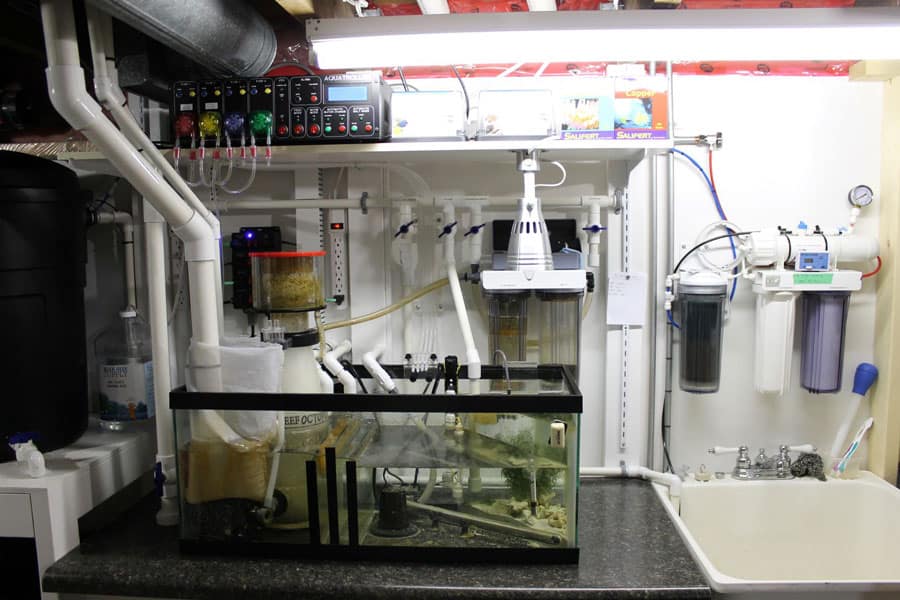
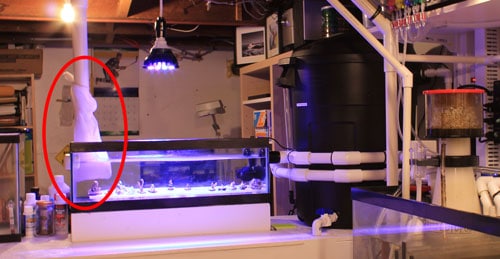
This is my sump installation in my basement. I was fortunate enough to have admission to the location direct under my aquarium to build my 'Fish Expanse'. This immune me great access and the room to expand and install a Quarantine Tank and a Frag Tank in the early on years subsequently initial installation.
The only downside to this was I had to have a large return pump that was expensive, to push the h2o support the 13ft to the superlative of my Brandish Tank.
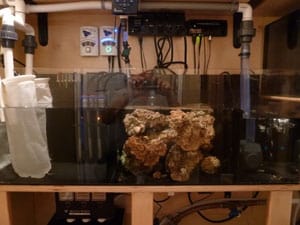
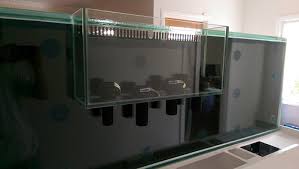
3. Sump Behind the Aquarium in a Divide Room
If your home and budget can adjust this it is past far one of the best installation methods you tin do for the ultimate reef tank setup!
By placing the sump in a room behind the aquarium you take a clean slate on how to design the layout, the space to add as much equipment equally you like, and room to add equipment after as your skills and tank progress.
The other good office nigh this is you are not pumping water up high, then the head pressure is greatly reduced allowing yous to use a lower wattage return pump.
For More information on Caput Pressure and Selecting the Best Render Pump Click Here to read my article.
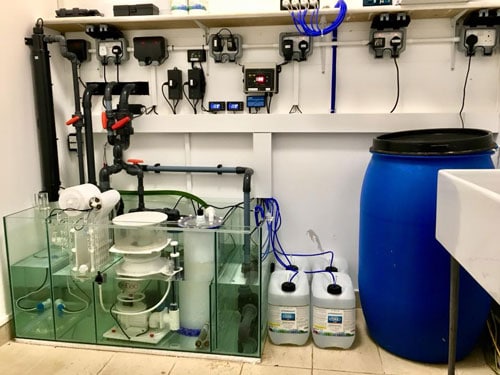
From a maintenance signal of view this method is past far the best if your partner volition allow you to catechumen a room into your 'Nerd Room'! Having access to a sink and being able to plumb in your water storage tanks is worth its weight in gold!
This may seem daunting but in one case you take spent some time on your knees under the stand up you will be planning your 'Fish Room' for your next build!
What Is The Recommended Menstruation Rate Through An Aquarium Sump?
The main purpose of the sump every bit we described earlier is to house equipment and provide greater water volume. The two principal pieces of equipment that are installed in most sumps are the Protein Skimmer and Heater/south. The thought is to find a return pump that matches the recommended menses rate of the protein skimmer.
The protein skimmer will have an optimum flow rate that information technology was designed for and almost aquarists recommend anywhere from 3x – 5x your tank capacity through your sump every hr.
For Example:
My aquarium is 75 gallons and so 3x volume per hour would be 75×three=225 gallons/60 minutes (GPH) menstruum rate.
My poly peptide skimmer is designed to operate around 200GPH so here is where I began the search for which render pump to use.
My return pump gives around 800GPH at 12ft head peak which is perfect for my setup because my sump is located in the basement below my aquarium. I have a manifold running additional equipment so I'thousand able to throttle down my render to the tank with a valve and so that the flow through the sump is around the 200GPH charge per unit.
Practice not get confused with the sump flow rate and display tank flow charge per unit. Your corals will need massive amounts of flow charge per unit, but this is created using wavemakers or powerheads.
All your return pump is for, is to set the menses rate through your sump and render the water back to the display tank.
Past having a slow flow rate through your sump, your h2o volition get maximum contact time with the Poly peptide Skimmer and your Heaters/Chiller and allow them to operate at their maximum efficiency.
Are There Any Aquarium Sump Installation Precautions?
The ii main areas I have seen crusade problems with new sump installations fall under one of the following categories. By being aware of these precautions to take you tin dramatically increase the chances of a mishap occurring with a new sump:
- Flooding Prevention
- Electrical Safety
Read on to find out how to keep rubber and prevent a huge mess!
Flooding Prevention
Existence an aquarium owner, one of the biggest fears many people take is flooding, especially with saltwater. If you have a alluvion with saltwater the damage tin can be huge! Not only does the water create problems merely once it dries the table salt is left behind making a big chore, even bigger.
Making your aquarium and sump as inundation-proof as possible is an absolute must, then here are some things to be enlightened of and steps to take to forestall a flood:
Power Outages
Once you have a sump installed into your system you lot have to make sure the operating water level in your sump is fix up correctly.
During a ability outage, the water that is in the pipe going up to the tank from the render pump is going to bleed back down into the sump. If your display tank is considerably higher than the sump and y'all accept a large bore piping, you could have a lot of h2o draining back down.
Many people use a Non-Return Valve on the return pump to prevent this, just if that fails and your sump level is not right, you will alluvion.
To ready your sumps operating water level I suggest this:
- Fill up your sump to 50% full with the return pump running.
- Disconnect the power to the pump and let the water dorsum drain into the sump.
- Measure how much the water level in your sump rises. This now shows you how much gap y'all need to leave at the top.
eg: Back Bleed amount rose sump water level by 4″ - Set normal operating h2o level to half dozen-7″ below the top of your sump. ie: Water changes should refill dorsum to this level and take your ATO set at this level.
- Draw a line on the sump glass at the normal operating water level. This allows for quick glances to see sump is at the correct level and your ATO is working properly.
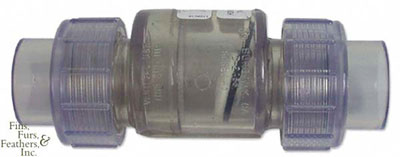
Not-Return or Check Valves
If you have a stiff desire to use a non-return valve that is OK. Only make certain you have your water level fix correctly, or if y'all are unable to do the above stride because besides much Dorsum Drain h2o comes in, yous then have to employ an NRV (Non-Return Valve) if y'all cannot fit a bigger sump.
When you are selecting an NRV I would suggest using the valves that have a flapper valve inside of them, rather than a spring-loaded valve.
The flapper valves take a lot less pressure to open compared to the spring-loaded valves and this will give you lot more menstruum out to your display tank. Y'all don't desire to be spending money on a skilful return pump and have all its pressure taken away because of a valve.
The other tip I recommend is spending a little extra money and buy the see-through valves with the matrimony connections on each end. This style you can run into if they are working correctly and information technology also allows y'all to come across when it needs cleaning.
You volition see an arrow molded into the side of the NRV. Brand sure this isPointing Away from your render pump!
Yous tin can find these clear Bank check Valves HERE at Amazon.com
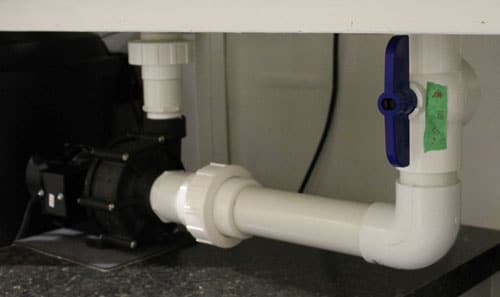
Next, install a ball valve betwixt your NRV and Display tank, this way you tin can isolate the water in the pipe to a higher place and hands remove the valve for cleaning.
Cleaning is the key to Non-Return Valves!
Improperly Sealed Aquarium Overflow
I accept seen a few floors flooded due to an improperly sealed overflow in the display tank. One time the h2o drains out of the overflow in a ability outage, the water in the display tank should non leak or creep into the overflow.
Exist sure to always leak check your aquarium AND overflow (outdoors) for several hours before you lot properly install your aquarium, to make sure information technology is all watertight where it needs to be.
Having a small leak into the overflow will continue to drain downward into the sump. Even if yous have set your sumps water level correctly, a slow leak over 8-10 hours will overfill your sump and flood the floor.
Leak Check Before Installation Saves Flooding!
Chock-full Filter Socks or Filter Floss
In the early weeks of your new aquarium be certain to keep an middle on how speedily your mechanical filter socks/floss brainstorm to clog up with detritus.
Proceed enough of spare socks or floss on mitt to replace your chock-full ones regularly. Once this filter becomes clogged it makes it harder for the water to pass through it.
As your livestock increase, your filters may clog faster, so go along an middle on them.
Depending on the blueprint of your sump y'all may not have a filter floss or sock h2o bypass in there to preclude a inundation. I change my socks weekly, and then have some filter floss in my bubble trap. I only place floss in 3/4 of the width of the bubble trap to allow h2o to by-pass if it becomes also clogged.
Ensure your filter socks are not well-nigh the border of your sump, so if the sock/south exercise overflow, they dump the water into your sump and not out over the edge.
Sump Overflow Drain
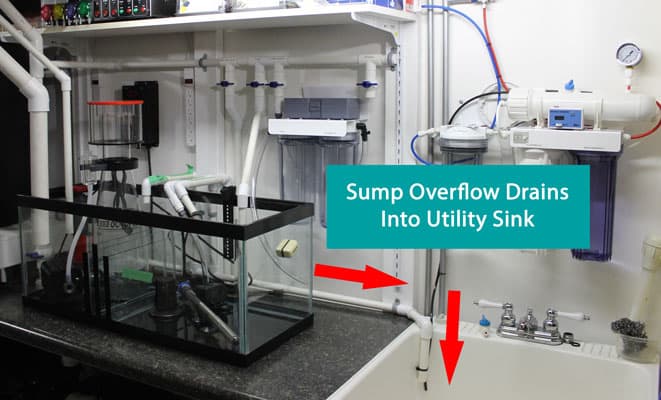
If you tin do this it may save your Butt! When you pattern your system you should e'er be looking at simple ways to cover your rear end. Having an overflow drain in your sump is one of them if your location allows.
In my sump, I drilled and installed a one/2″ bulkhead about one″ from the acme of my sump, then piped this into my house drain. This saved me from a flood when I found out my aquarium overflow developed a pinhole leak and we had a power outage 2 years after installation.
This is going to be a tough job for many people who have their sump located in the stand, and there is no basement admission beneath or some form of house drain nearby, just lower than the Overflow hole in the sump, just if you can, do it! It is worth it!
Recall of the Sump Overflow equally an overflow hole in a typical sink.
Water Alarms
There are two types I want to include here:
- High H2o Level Warning
- Leak Detection/Flood Alarm
These are lifesavers! I have both fitted to my aquarium via my DIY built controller and these alarms have saved me.
As humans, we all make mistakes, forget to turn something back on, drink alcohol while doing maintenance etc and we forget!
You tin purchase or create your own simple devices that can alert you straight away to a leak or an impending leak, so you can take action to prevent any further mess.
Pretty much all the aquarium controllers available today have this function and you can also have them shut down pumps, send you texts etc to help forbid the chaos getting worse.
If you cannot afford a controller, you can buy a simple flood detection alarm that sits side by side to your sump and notifies you that you have water where you shouldn't.

This 1 Here at Amazon.com works cracking by sounding an audible alarm and linking to an app on your smartphone to provide an warning if you lot are not dwelling to hear information technology! Oh, and it's inexpensive! Delight get one at the very least. Yous will not regret it!
Electrical Safety
Electrical safe with aquariums is absolutely paramount, ESPECIALLY with saltwater!
The two main hazards we are looking at here are electrocution and burn and both of them demand to be considered advisedly on how to foreclose both, ALL THE Time.
Electrical Shock
If you lot take a faulty piece of equipment or an item falls into the sump while you are working in it, you lot are going to be in real problem if you have not taken the following precautions. Saltwater specially, conducts electricity then well that y'all need to be careful and do the following steps:
- Ensure all equipment has baste loops in the cablevision
- If electric sockets are close, cover them with external weatherproof covers
- Ensure whatsoever electric equipment is securely fastened to the aquarium stand or similar
- Practice non residue Refugium light fixtures on the top of the sump. Append them or use a fixing kit
- Beware of common salt creep – Proceed it cleaned off electrical items at all time
- Unplug any item while working on it
- Beware of water splashing on an electric item
- Keep a close heart on 'Drinking glass Heaters', they tin can crack and cause electrocution.
To farther assistance in protecting you lot, have your plug outlets replaced to GFCI receptacles. These are designed to monitor the items plugged into them and trip at the first sign of a fault.
If y'all cannot afford an electrician to replace your receptacles you can use a GFCI Adapter that yous plug into the wall.
This GFCI Adapter from Amazon.com is perfect for helping to keep you lot safe. As with everything be sure to test the manual exam function regularly.
Many people complain almost GFCI breakers or receptacles tripping and causing a tank crash. If information technology is tripping there is a piece of equipment that is not working correctly and you need to further investigate.
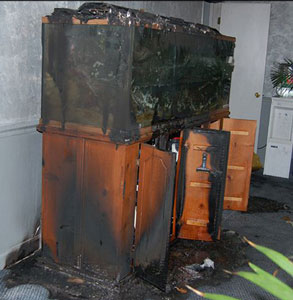
Burn
Fire is the second major concern with electrical prophylactic. Every bit mentioned earlier, saltwater is very conductive to electricity and an improperly protected device could ignite when it fails and cause a burn down.
Burn can commencement in an aquarium stand and spread to the surrounding items.
A good tip I got told a few years ago and I notwithstanding use information technology to this day is to install a small smoke warning within the stand of your aquarium or the ceiling of your fish room.
Early detection is essential for the protection of not only your aquarium only too your home and family
If y'all wish to discover out even more issues areas that can cause you lot stress with your aquarium installation I highly recommend you have a read of this commodity I wrote: Aquarium Overflowing & Leak Prevention – 18 Trouble Areas
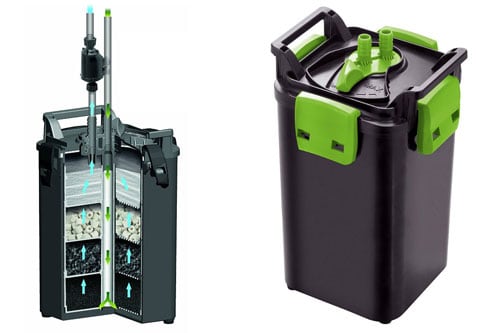
Which Is Amend – Aquarium Sump Or Canister Filter?
For many of you that have had an aquarium before you will be familiar with e the canister filter, but for those who are completely new to aquariums, a canister filter is a sealed canister that contains a pump that sucks h2o from your brandish tank, passes information technology through the various filter media to provide the cleaning and and then returns the h2o dorsum into the tank.
These type of filters are very popular in the freshwater aquarium hobby and they work well. They are relatively easy to maintain and are elementary to prepare.
I would recommend these for a freshwater tropical aquarium but not for a saltwater aquarium. I have constitute that they can be easily forgotten equally they become tucked away and then owners procrastinate in cleaning them.
This leads to high Nitrate levels from the detritus (waste material & debris) building in the filter media.
To detect out more on Nitrate and the Nitrogen Cycle Click Here to read my commodity.
The other main problems with these are that you are express to how much filter media they can hold and you still have to accept some equipment in the display tank. Eg: Poly peptide Skimmer, Heater, Chiller (If required) Supplemental Media Reactors, Refugiums etc.
These are a good filter, merely in my stance for a freshwater tropical aquarium only.
You lot can notice out more about using canister filters from my article: Tin can Yous Apply A Canister Filter For A Reef Aquarium?
To Finish
Well, there you take it folks, pretty much everything I could remember of that you would need to learn about installing a sump on your aquarium. Sumps are such a great addition and at that place is a reason when over 95% of saltwater aquarium owners employ 1 and if y'all have a freshwater aquarium, it allows you to hide all of the equipment to allow the full dazzler of the tank to exist seen without distraction!
Farther Reading
If you found this article helpful may I suggest a few more than for you:
- Protein Skimmers: All you Need to Know!
- Selecting The Right Aquarium Render Pump
- What Is An Aquarium Chiller?
- How To Select An RO/DI Arrangement For Your Aquarium
- Aquarium UV Sterilizers – What Do They Actually Practise?


How To Set Up A Fish Tank Sump,
Source: https://www.thebeginnersreef.com/aquarium-sumps-what-are-they-how-do-they-work/
Posted by: dawsononstry.blogspot.com
0 Response to "How To Set Up A Fish Tank Sump"
Post a Comment